
 EN
 ZH
 JA


LED Strip Installation: Step-by-Step Guide (12V/24V & Wiring)
LED strip installation is easier than most DIYers fear—but only when the prep is right. Low-voltage linear strips are simple to mount; with proper measurements, correct voltage matching, and accurate power calculations, you can achieve a trouble-free install on the first attempt. Yet many homeowners and small installation teams lack standard procedures, leading to power supply overloads, end-of-strip dimming, poor connections, and adhesive failure. Drawing on 21 years in LED linear lighting, Mingxue Optoelectronics has compiled standardized installation steps—from voltage selection and power math to wiring and mounting—for both home DIY and commercial projects.
1. Pre-installation: Measurement and planning to avoid errors in dimensions or accessories
Before purchasing flexible LED strips, conduct an on-site survey and plan carefully to minimize material waste and the need for rework:
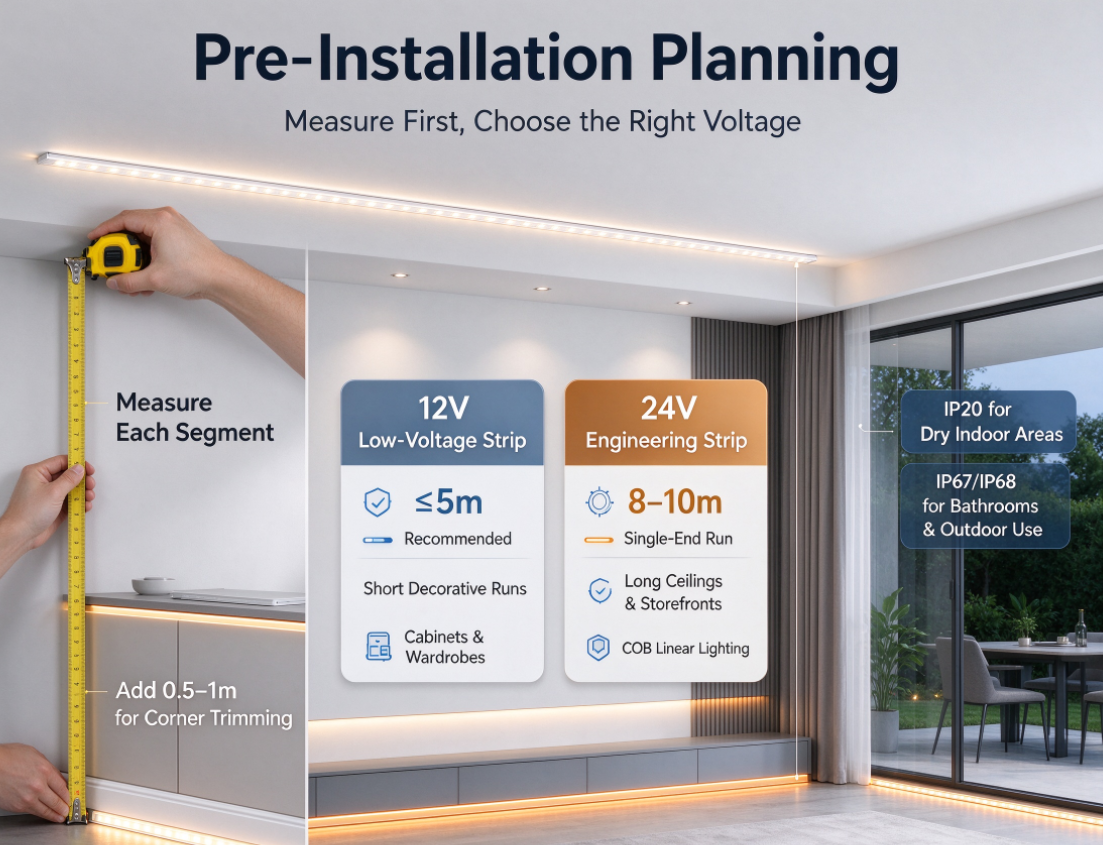
1.1. Precisely measure the length of each installation area segment—recording ceilings, cabinets, and baseboards separately—and sum the lengths to determine the total meterage; it is recommended to allow an extra 0.5–1 meter for trimming at corners.
1.2. Sketch a simple lighting layout, marking the locations of power outlets and transformers; calculate the wiring distance from the power source to the LED strip and prepare suitable extension cables.
1.3. Distinguish between usage scenarios: choose IP20 bare-board strips for dry indoor areas, and IP67/IP68 waterproof neon strips for bathrooms or outdoor use.
LED strips on the market generally come in two low-voltage specifications: 12V and 24V. They must **never** be plugged directly into 220V mains power; a dedicated power supply (driver) is required:
12V dual-color temperature ambient strips: Suitable for short-distance decorative applications (under 5 meters) such as cabinets, wardrobes, and entryways; low power consumption makes them the top choice for DIY projects in small home spaces.
24V commercial-grade COB strips: Draw less current for the same power output and experience minimal voltage drop over long distances; they maintain uniform brightness even with single-end power input over 8–10 meters, making them ideal for long ceiling runs, storefront facades, and linear wall-washing in shopping malls.
2. Key Step: Precise Power Supply Calculation
Incorrect power supply selection is the primary cause of LED strip burnout, flickering, and dimming at the far end. Always follow this calculation formula:
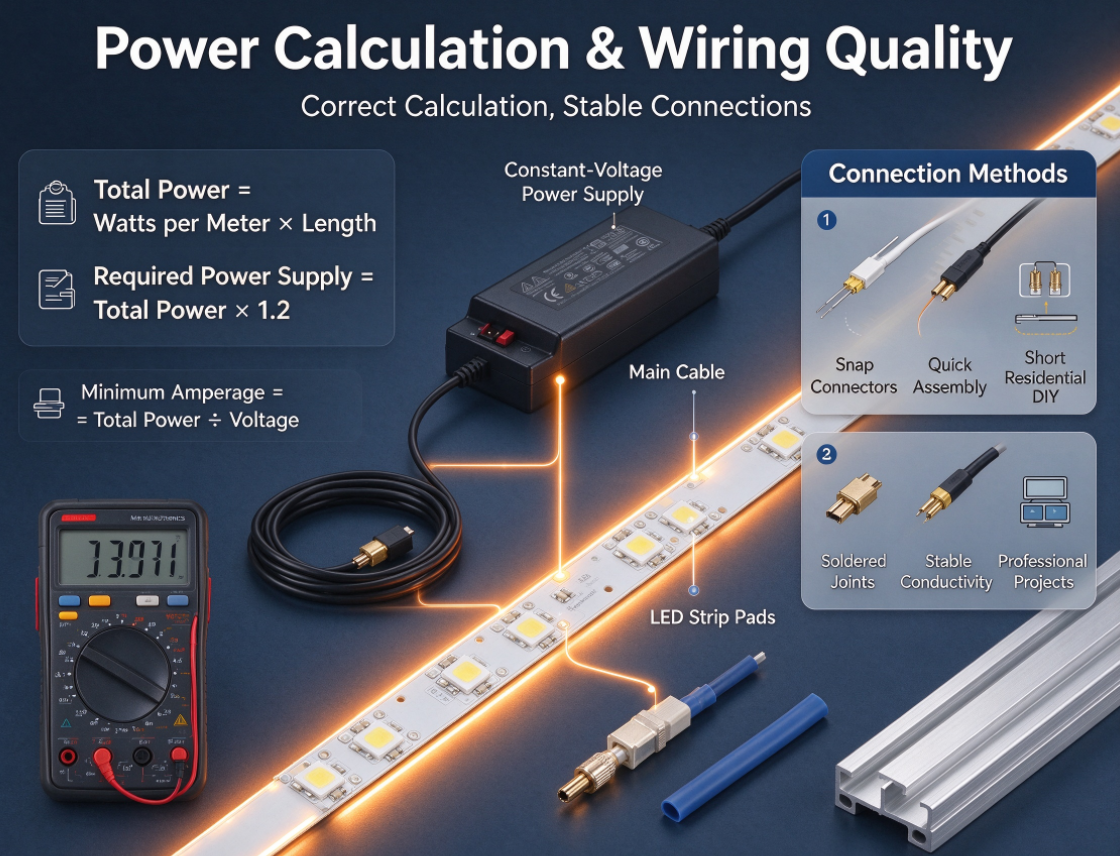
2.1. Power per meter × Total strip length = Total power consumption (watts)
2.2. Total wattage × 1.2 (20% safety margin) = Minimum required power supply wattage
Reserving a 20% margin prevents the power supply from overheating and aging due to prolonged full-load operation, thereby extending the lifespan of the entire lighting system.
Simple current conversion: Minimum amperage = Total power ÷ Strip voltage. Insufficient current causes significant brightness drop-off in the latter sections of long strips; a multimeter can be used while powered on to verify if the voltage meets requirements.
Power supply types include compact adapters and high-power rainproof drivers: use plug-in adapters for short residential strips; for outdoor use or long-run commercial lighting (tens of meters), select rainproof constant-voltage drivers and house them in waterproof junction boxes.
3. Wiring and connection methods (categorized by residential and professional project applications)
3.1 Quick-connect snap connectors:
Suitable for short-term residential DIY projects; no tools required—simply align and snap the positive and negative terminals together for easy assembly and disassembly. However, they are prone to loosening and poor contact in environments with sustained high temperatures.
3.2 Solder connections:
The preferred choice for professional lighting projects and permanent installations (such as linear lights in suspended ceilings). Soldered joints offer stable conductivity, preventing future issues like isolated light failures or color inconsistencies. For outdoor LED strips, soldered connections must be sealed with heat-shrink tubing to ensure waterproofing.
4. Finalizing Installation and Powering Up
Clean the mounting surface with alcohol to remove oil and dust; once dry, peel off the backing from the LED strip’s pre-applied 3M adhesive and press it firmly into place. Since long, high-density COB strips may peel at the edges if secured solely by adhesive, consider reinforcing them with hot-melt adhesive or aluminum mounting channels. After all wiring connections and insulation measures are complete, connect the power supply to test the entire strip for any irregularities in brightness or color.
5. Comparison Table: Installation and Adapter Differences for 12V/24V LED Strips
| Comparison Dimension | 12V Low-Voltage Ambient LED Strip | 24V Engineering Linear LED Strip | Suitable Lighting Scenarios |
|---|---|---|---|
| Max Safe Single-End Length | ≤5m; significant voltage drop beyond 5m | Uniform brightness up to 8–10m from single end | Long suspended ceilings, exterior facade lighting for street shops |
| Operating Current | Higher current at equal power, high loss over long wires | Current halved; voltage drop greatly reduced | COB wall washer strips for shopping mall atriums |
| Power Supply Spec | Small plug-in adapters, convenient for home use | High-power rainproof drivers for engineering projects | Outdoor IP67 waterproof neon LED strips |
| Splicing Durability | Clip connectors sufficient for short runs | Soldered wiring recommended for extra-long projects | DMX512 dynamic pixel lighting projects |
| Typical Applications | Cabinets, wardrobes, short decorative runs in bedrooms | Whole-house no-main-light design, municipal landscape lighting | Medical aesthetics & fashion showroom long linear lighting |
6. Q&A Session
Q1: For a 12-meter COB LED strip in the living room ceiling, should I choose 12V or 24V? How do I calculate the power supply requirements?
A: Prioritize a 24V strip with thickened copper foil to prevent dimming at the far end. Assuming 12W/m, the total power is 12m × 12W/m = 144W; applying a safety margin (144W × 1.2), you need 172.8W, so select a rainproof power supply rated at 200W.
Q2: Snap-on connectors are fine for home interiors, but for outdoor facade lighting, is soldering or a snap-on connector recommended?
A: Outdoor environments involve intense sunlight and significant temperature fluctuations, causing snap-on connectors to loosen and admit water over time. You must use a combination of solder and adhesive-lined heat-shrink tubing for a dual seal to prevent water ingress, short circuits, and the need for rework.
Q3: What happens if I connect a 12V LED strip to a 24V power supply?
A: The excessive voltage will instantly overload and burn out the LED chips. Conversely, connecting a 24V strip to a 12V power supply results in very low brightness and a dull, grayish color, rendering it unusable; voltage must strictly match.
Q4: How can I fix the issue of a 10-meter, 12V dual-color temperature strip being very dim at the end when powered from only one side?
A: 12V strips suffer from significant voltage drop over long distances. Solve this by powering both ends simultaneously or by switching to a 24V strip of the same specifications.
Q5: Can I test the LED strip by powering it up while it is still wound on the reel?
A: Absolutely not! Heat dissipation is extremely poor when the strip is wound in a full roll, leading to rapid heat buildup and burnout of the LED chips. You must fully unroll and lay the strip flat before installation or testing.
Q6: Does Mingxue Optoelectronics provide solutions for installation and power supply selection?
A: Mingxue Optoelectronics offers matching power supplies, waterproof connectors, and aluminum profiles for all its COB, dual-color temperature, and outdoor waterproof LED strips. Our technical team can calculate the required driver wattage based on project length and voltage specifications, and provide comprehensive guidance on wiring and installation.
When installing COB linear LED strips or outdoor neon lights, many DIY homeowners and small-scale lighting contractors encounter issues—such as overheating or burnt-out power supplies, dimming at the far end of the strip, and water ingress at connectors—due to a lack of knowledge regarding voltage matching, power calculation, and voltage drop over long distances. These problems lead to repeated rework, driving up material and labor costs.
With 21 years of expertise in linear LED lighting, Mingxue Optoelectronics operates a 24,000-square-meter facility offering a comprehensive, one-stop solution that includes 12V/24V LED strips, compatible constant-voltage power supplies, waterproof connectors, and aluminum mounting accessories. We maintain two distinct product lines: short-length ambient lighting strips for home interiors and long-run linear lighting for professional projects. Upon ordering, we precisely calculate the required wattage based on dimensions and installation environments, provide standardized installation procedures and wiring schemes for long-distance power injection, and offer guidance on waterproof soldering for outdoor projects. Whether for bulk purchases of accent lighting for “no-main-light” home designs, cross-border linear lighting orders, or municipal landscape lighting projects, clients can request free samples and power supply specifications. We help avoid circuit and brightness issues from the initial selection phase through to final installation, thereby reducing the rate of post-installation repairs.
Published by Mingxue Lighting | Founded 2005 | Shenzhen R&D Center + Foshan Manufacturing Base | 24,000 sqm | ISO 9001 Certified


